Aquarium Substrate Calculator
What is the Substrate Calculator?
This calculator tells you exactly how much substrate (gravel, sand, or soil) you need to buy for your aquarium. Simply enter your tank dimensions and desired substrate depth, and we'll calculate the weight and volume needed.
The calculator also shows how much water your substrate will displace. That is critical for accurate medication dosing and water treatment calculations.
How to Use This Calculator
- Choose your input method: enter dimensions OR just enter volume (gallons/liters)
- If using dimensions: select your tank shape (rectangular, cylinder, bowfront, etc.)
- Enter your tank's length and width (or select a common tank size)
- Choose your substrate type (gravel, sand, aquasoil, etc.)
- Enter your desired depth (we recommend 1-3 inches for most tanks)
- See instant results: weight needed, volume, and water displacement
How would you like to enter your tank info?
What's your tank shape?
Enter Your Tank Dimensions
Substrate Type
Desired Substrate Depth
Recommended: 1-2 inches (2.5-5 cm) for fish-only tanks, 2-3 inches (5-7.5 cm) for planted tanks.
Need Help Measuring Your Tank?
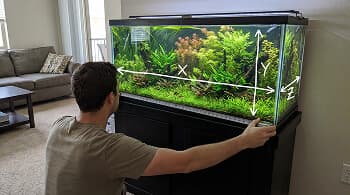
How to Measure Your Aquarium →
Not sure how to measure your tank dimensions? We have a complete visual guide with step by step instructions.
Click to see the full measuring guide
Recommended For Your Tank
Recommended gear for this setup
~45 gal tank
Water conditioners
Helpful when hardscape and substrate reduce real fill volume.
Filters for your build
Useful once the scape and final footprint are taking shape.
- Fluval 307 Performance Canister Filter (up to ~70 gal)$189.994.4Strong brand-name canister for mid-size tanks when turnover math points to serious flow; quieter eTEC pump vs many budget canisters.
- Fluval 407 Performance Canister Filter (up to 100 gal)$229.994.5Fix for low turnover; quiet, high capacity enthusiast upgrade.
- Fluval FX2 High Performance Canister Filter$244.374.2Premium upgrade for large-tank flow; step up from HOB.
As an Amazon Associate we earn from qualifying purchases.
What's Next?
You know how much substrate to buy. Now plan the rest of the build:
Volume Calculator →
Get real water volume after substrate displacement for accurate dosing
Stocking Calculator →
Plan fish numbers now that you know the substrate and layout
Light Calculator →
Match light output to your substrate and plant goals
Setup Cost Calculator →
Budget the full build including substrate, hardscape, and gear
What is the Substrate Calculator?
This calculator tells you exactly how much substrate (gravel, sand, or soil) you need to buy for your aquarium. Simply enter your tank dimensions and desired substrate depth, and we'll calculate the weight and volume needed.
The calculator also shows how much water your substrate will displace. That is critical for accurate medication dosing and water treatment calculations.
How to Use This Calculator
- Choose your input method: enter dimensions OR just enter volume (gallons/liters)
- If using dimensions: select your tank shape (rectangular, cylinder, bowfront, etc.)
- Enter your tank's length and width (or select a common tank size)
- Choose your substrate type (gravel, sand, aquasoil, etc.)
- Enter your desired depth (we recommend 1-3 inches for most tanks)
- See instant results: weight needed, volume, and water displacement
The complete guide to aquarium substrate: types, depth, layering, and everything you need to know
Substrate is not decoration. It is the foundation of your aquarium, and the choice you make here ripples through plant growth, fish health, water chemistry, cleaning effort, and long-term stability. The right substrate in the right amount makes a tank easier to plant, easier to maintain, and more resilient. The wrong choice creates problems that are expensive and disruptive to fix once the tank is running.
This guide covers everything you need to decide before you buy: which type to use, how deep to go, how much to order, how to layer, how to install, and what to watch for after setup. Whether you are filling a 10-gallon betta tank with sand or scaping a 75-gallon planted display with aquasoil and rock, the fundamentals are the same.
Use the calculator result as your starting point
Run the calculator above to get your base weight and volume, then read through the sections below to adjust for your specific layout, substrate type, and tank goals. Always round up by 10–20% to cover slopes, rinsing loss, and settling.
Every substrate type compared: when to use each one
There is no single best substrate. Each type has strengths and trade-offs, and the right pick depends on your livestock, plants, water chemistry goals, and maintenance tolerance. Here is what each option actually does in practice.
| Type | Best for | Watch out for | Cost |
|---|---|---|---|
| Gravel (2–5mm) | Community tanks, beginners, easy cleaning | Food and waste fall between gaps; sharp edges hurt bottom dwellers | $ |
| Pool filter sand | Corydoras, loaches, natural look, low budget | Compacts over time; needs occasional stirring to prevent gas pockets | $ |
| Fine sand (sugar-size) | Planted carpets, shrimp tanks, delicate bottom dwellers | Compacts faster; blows around under strong flow; can go anaerobic if deep | $–$$ |
| Aquasoil (ADA, Fluval Stratum, etc.) | Planted tanks, aquascaping, shrimp breeding | Lowers pH; can cloud water initially; depletes nutrients over 1–3 years; costs more | $$$ |
| Crushed coral / aragonite | African cichlids, brackish tanks, marine, pH buffering | Raises pH and hardness; not suitable for soft-water species | $$ |
| Bare bottom | Quarantine, fry tanks, high-bioload setups, easy cleaning | No biological surface area; fish may feel exposed; looks clinical | Free |
Gravel: the all-rounder
Standard aquarium gravel (2–5mm grain size) is the most common starting substrate for good reason. It is cheap, easy to rinse, easy to vacuum with a standard gravel siphon, and available in dozens of colors and grain sizes. It works well for community freshwater tanks, beginner setups, and fish-only displays where plant growth is not a primary goal.
The downsides are real but manageable. Food particles and fish waste fall between the gaps and accumulate if you do not vacuum regularly. Sharp-edged gravel (common with painted or dyed varieties) can injure bottom-dwelling fish like corydoras that sift and rest on the substrate. Gravel provides no nutrients to plants, so rooted species will need root tabs or liquid fertilizers supplemented separately. For planted tanks where you want serious root growth, gravel works best as a cap layer over a nutrient-rich base.
Sand: natural look, great for bottom dwellers
Sand is the preferred substrate for any tank housing corydoras, loaches, kuhli loaches, or other fish that sift, burrow, or rest flat on the bottom. Their barbels and undersides evolved for soft surfaces, and rough gravel can cause irritation, infections, and behavioral changes.
Pool filter sand is the budget champion: $10–$15 for a 50-pound bag that fills most tanks. It rinses relatively quickly (though you will still need multiple washes to clear the dust), drains well, and provides a natural tan or white color. Play sand works too but is finer and muddier to rinse. Specialty aquarium sands cost more for tighter color control and pre-rinsed convenience.
The main maintenance consideration with sand is compaction. Over weeks and months, sand can pack tightly and develop anaerobic pockets (low-oxygen zones that produce hydrogen sulfide, the rotten-egg smell). The fix is simple: gently poke or stir the sand surface during water changes, or keep Malaysian trumpet snails that aerate the bed naturally. Do not build sand deeper than 2 inches in most setups unless you have a specific reason and a plan for aeration.
Aquasoil: the planted tank powerhouse
Aquasoils (ADA Amazonia, Fluval Stratum, UNS Controsoil, Tropica Soil, etc.) are baked-clay substrates loaded with nutrients and designed specifically to support rooted aquarium plants. They lower pH and soften water slightly, which is ideal for many tropical plants, shrimp, and soft-water species. If serious plant growth is your primary goal, aquasoil is usually the most effective substrate choice.
The trade-offs: aquasoil costs 3–5x more than inert gravel per pound. It can cloud water during initial setup (especially if disturbed heavily). It releases ammonia during the first 1–4 weeks, which means you need to cycle the tank with it installed before adding livestock. And it depletes over time, typically losing most of its active nutrient value within 1–3 years depending on plant density and fertilization. When it depletes, you supplement with root tabs or consider a partial rescape.
A 9-liter bag of aquasoil ($20–$35) covers roughly 1.5–2 inches of depth on a standard 20-gallon tank footprint. Most planted builds need 2–4 bags depending on target depth and slope.
Crushed coral and aragonite: when you want pH up
Crushed coral, aragonite sand, and similar calcium-based substrates dissolve slowly and buffer water toward higher pH and hardness (KH/GH). This makes them ideal for African cichlid tanks, livebearers that prefer hard alkaline water, and brackish setups. They are also used in marine and reef tanks as sand beds.
Do not use these in soft-water setups. If you are keeping tetras, rasboras, discus, apistos, or crystal shrimp that need acidic or neutral water, crushed coral will constantly fight your water chemistry. The buffering effect is continuous: as long as the substrate is in the tank, it is dissolving and raising mineral content.
How deep should substrate be? The complete depth guide
Depth is the second most important substrate decision after type. Too shallow and plants cannot root, slopes look flat, and the glass bottom shows through. Too deep and you create anaerobic zones, waste traps, and difficulty cleaning. The right depth depends entirely on what the tank is for.
| Tank type | Recommended depth | Why |
|---|---|---|
| Fish-only community | 1–2 in (2.5–5 cm) | Easy to vacuum; enough to look intentional without trapping excess waste |
| Low-tech planted | 1.5–2.5 in (4–6 cm) | Sufficient root depth for java fern, crypts, anubias (many of which attach to hardscape anyway) |
| High-tech planted / aquascaped | 2–4 in (5–10 cm) | Deep-rooting stem plants and carpets need room; slopes need volume |
| Sand for bottom dwellers | 1–1.5 in (2.5–4 cm) | Enough for sifting; shallow enough to prevent compaction and gas pockets |
| Cichlid tank (African) | 1–2 in (2.5–5 cm) | Cichlids dig; substrate needs to survive rearrangement without burying equipment |
| Reef / marine sand bed | 1–2 in (2.5–5 cm) or bare | Thin bed for aesthetics and microfauna; deep sand beds (4–6 in) are a separate advanced method |
| Shrimp tank | 1.5–2.5 in (4–6 cm) | Buffering aquasoil needs enough volume to maintain pH over time; too deep wastes money |
How much to buy: from calculator result to checkout
The calculator gives you a base weight and volume for your target depth. Here is how to turn that into an actual shopping decision.
- Flat bed, fish-only: The calculator estimate is usually accurate. Buy the next bag size up from your result to have a small buffer.
- Sloped aquascape: Use the sloped-bed mode in the calculator, then add 15–20% because slopes settle, hardscape displaces substrate, and you will want extra for touch-ups in the first month.
- Layered build (nutrient base + cap): Run the calculator separately for each layer. A typical layered planted build might use 1 inch of nutrient substrate topped with 1–1.5 inches of sand or fine gravel. Calculate each depth independently and sum the weights.
- Fixed bag sizes: If the substrate comes in 5 lb, 10 lb, or 9 L bags, always round up to the next whole bag. Coming up half a bag short mid-setup is a common frustration.
- Rinsing loss: Rinsing removes dust and fines, which means you lose some material. Sand and aquasoil can lose 5–10% of volume during thorough rinsing. Factor that in.
How to layer substrate: the complete method
Layering serves different purposes depending on the tank. In planted builds, it puts nutrients where roots can reach them while keeping the visible surface clean. In aquascapes, it builds height for dramatic slopes. In budget builds, it lets you use cheap filler for hidden volume and reserve expensive material for the surface layer.
The key rule: finer material always migrates downward through coarser material over time. If you put fine sand on top of large gravel, the sand will eventually work its way down and the gravel will push up. This is normal physics and cannot be fully prevented, only managed. Here is how to layer effectively:
- 1
Bottom: height filler or nutrient base
For planted tanks, this is typically a nutrient-rich substrate (laterite, Power Sand, or mineralized topsoil). For aquascapes that need height without cost, lava rock rubble, pumice, or plastic egg crate can build volume that the cap covers. Keep this layer 0.5–1.5 inches thick.
- 2
Middle: main substrate body
This is where most of the depth lives. Aquasoil for planted tanks, sand for natural setups, or gravel for community builds. Shape your slopes here, packing tighter toward the back and sides. 1–3 inches depending on goals.
- 3
Top: cosmetic cap (optional)
A thin layer (0.25–0.5 inches) of fine sand, cosmetic gravel, or contrasting material over the main substrate. Purely aesthetic. Make the cap thick enough that the base does not show through when plants are moved or fish dig, but thin enough that plant roots can still reach the nutrient layer.
- Use mesh or a thin barrier between radically different grain sizes if you want to slow migration (though most hobbyists skip this and accept some mixing).
- Large hardscape (stones, driftwood) should be placed before substrate or rested on the glass bottom with substrate packed around them. This prevents toppling if fish dig underneath.
- Buy extra cap material for touch-ups. Rescaping, replanting, and gravel vacuuming will expose lower layers over time.
How substrate affects water chemistry
Not all substrates are chemically neutral. Understanding what your substrate does to water parameters is critical for species compatibility and long-term stability.
- Inert substrates (most gravel, pool filter sand, blasting sand): No effect on pH, KH, or GH. Your water chemistry stays whatever comes out of the tap (or your RO unit). This is the safest default if you are unsure.
- Aquasoil: Lowers pH and softens water by absorbing minerals. Great for soft-water species, Caridina shrimp, and plants that prefer acidic conditions. The buffering effect weakens over 1–3 years as the substrate exhausts.
- Crushed coral, aragonite, Texas holey rock, and similar calcium-carbonate substrates: Slowly dissolve to raise pH, KH, and GH. Ideal for African cichlids, livebearers, and brackish setups. Will fight you constantly if you need soft, acidic water.
- Fluorite and similar clay substrates: Mostly inert with minor mineral leaching. Safe for most setups; primarily marketed as a planted-tank substrate with modest nutrient content.
If you are keeping species with specific water chemistry requirements (discus, crystal shrimp, Tanganyikan cichlids), choose your substrate with chemistry in mind, not just appearance. Trying to chemically override an active substrate with additives is a constant battle you do not want.
Substrate recommendations by fish type
- Corydoras and kuhli loaches: Fine, smooth sand is ideal. They sift through it with their barbels to find food. Sharp gravel causes barbel erosion, mouth damage, and behavioral withdrawal. Pool filter sand or play sand works perfectly.
- Goldfish: Avoid gravel small enough to swallow. Goldfish are notorious for eating substrate and getting pieces stuck in their mouths. Use sand, large river rocks, or bare bottom.
- African cichlids: Crushed coral or aragonite sand provides both the alkaline buffering they need and a natural digging medium. They will rearrange it constantly; accept this and keep the bed shallow.
- Bettas: Smooth gravel or sand. Avoid anything with sharp edges that could tear their fins. Dark substrate often shows their colors better.
- Shrimp: Aquasoil for Caridina (crystal shrimp) that need acidic, soft water. Inert sand or fine gravel for Neocaridina (cherry shrimp) that tolerate a wider range. Avoid substrates coarse enough for baby shrimp to get trapped between.
- Plecos and bottom feeders: Smooth sand or fine gravel. Rough substrates can damage their undersides. Provide driftwood and hiding spots regardless of substrate choice.
Why the displacement number matters more than you think
The calculator shows how much water your substrate displaces, and that number matters for every calculation that follows. A 20-gallon tank with 2 inches of gravel, a large piece of driftwood, and a pile of rocks might actually hold 15–16 gallons of water. That is a 20–25% difference from the label on the tank.
Dosing medications, fertilizers, dechlorinator, and salt for 20 gallons when you only have 16 gallons of actual water means you are overdosing by 25%. On a small tank with sensitive species, that margin matters. After you set up the substrate and hardscape, rerun the volume calculator to get your real water volume, and use that number for all treatments and equipment sizing going forward.
- Subtract the displacement from your tank's gross volume before dosing any medications or treatments.
- If you add or remove hardscape later, recalculate. Volume changes every time you modify the layout significantly.
- Equipment sized to gross volume (heaters, filters) is usually fine since they are designed with margin. But dosing chemicals based on gross volume is where overdosing risk lives.
How to rinse and install substrate properly
Rinsing is the difference between a tank that clears in hours and one that stays cloudy for a week. The method depends on the substrate type:
- Gravel: Rinse in a bucket or colander under running water until the runoff is clear. Stir aggressively. Usually takes 3–5 rounds. Most gravel rinses quickly.
- Sand (pool filter, play sand): Rinse in small batches in a bucket. Fill, stir vigorously, pour off the cloudy water, repeat 5–10 times per batch. Sand takes longer than gravel because the fines are smaller. Do not skip this unless you enjoy a week of murky water.
- Aquasoil: Most manufacturers recommend minimal rinsing or no rinsing. Rinsing too aggressively breaks the granules and creates mud. Expect cloudiness during the first fill; it clears with filtration and water changes over a few days. Some brands (especially ADA Amazonia) release significant ammonia for 2–4 weeks after setup, which is part of the cycling process.
- Crushed coral: Rinse thoroughly. Coral dust is extremely fine and will cloud water heavily if not rinsed out. Multiple rinse cycles until the water runs mostly clear.
When filling the tank over substrate, place a plate, plastic bag, or shallow bowl on the substrate surface and pour water onto it to diffuse the flow. This prevents the water stream from blasting a crater in your carefully shaped substrate bed. Fill slowly. Patience during the first fill saves hours of rescaping.
Long-term substrate maintenance
Substrate is not a set-and-forget component. Every type needs some ongoing attention to stay functional and healthy.
- Gravel: Vacuum during water changes by pushing the siphon into the gravel to pull out trapped waste. Do a section at a time rather than the entire bed in one session. Rotate zones across water changes.
- Sand: Hover the siphon just above the sand surface to pick up surface debris. Gently stir compacted areas periodically (every 1–2 weeks) to prevent anaerobic pockets. Malaysian trumpet snails do this naturally.
- Aquasoil: Do not vacuum aggressively; it breaks down the granules and kicks up nutrients that feed algae. Light surface cleaning is fine. Over years, aquasoil compacts and loses structure. Top-up with fresh material or switch to root tabs as nutrients deplete.
- Crushed coral: Vacuum like gravel. Over time the buffering capacity slowly diminishes as the material dissolves. If pH/KH starts dropping in a tank that uses crushed coral for buffering, add more or replace the top layer.
When to replace or refresh substrate
Full substrate replacement is a major disruption. It removes a huge portion of your beneficial bacteria colony, destabilizes water chemistry, stresses fish, and essentially requires a partial re-cycle. Avoid it unless truly necessary. Here is when it makes sense:
- Replace when the substrate type is fundamentally wrong for the tank (e.g., sharp gravel causing injury to bottom dwellers, or crushed coral in a tank that needs soft water).
- Replace when substrate is so old and compacted that it produces persistent hydrogen sulfide (rotten egg smell when disturbed) and cannot be recovered with stirring or thinning.
- Refresh (partial replacement) when aquasoil is visibly broken down into mud and no longer holding structure. Replace 30–50% at a time with new material, waiting 2–4 weeks between sessions to let the biofilter recover.
- Top up when slopes have flattened, thin spots show glass, or settling has reduced depth below functional levels. This is normal maintenance, not a sign of failure.
- Add root tabs when nutrient substrates have depleted but the physical structure is still fine. This extends the life of aquasoil by years in many cases.
The most expensive substrate mistakes and how to avoid them
- 1.
Buying too little. Running short mid-setup is the most common substrate mistake. You end up with an unfinished look, exposed glass, and a second trip to the store where the exact same product may not be in stock. Buy 15–20% more than the calculator suggests.
- 2.
Choosing substrate for looks without considering function. White sand shows every speck of waste. Black sand shows nothing, which sounds great until detritus builds up invisibly and water quality degrades. Colored gravel adds nothing biologically and often chips or fades. Choose for function first, then find a color you like within that category.
- 3.
Going too deep in a fish-only tank. A 4-inch gravel bed in a non-planted tank is a waste trap. It looks thick, collects uneaten food and waste deep in the bed where your vacuum cannot reach, and creates anaerobic zones. 1–1.5 inches is usually plenty for fish-only.
- 4.
Using sharp gravel with bottom dwellers. Corydoras barbel erosion from rough substrate is one of the most common preventable injuries in the hobby. If you keep any fish that touches the substrate regularly, use smooth sand or smooth fine gravel.
- 5.
Skipping the rinse. Unrinsed sand and gravel will cloud your tank for days or weeks. Unrinsed crushed coral is even worse. The 20–30 minutes spent rinsing properly is the highest-return preparation step in the entire setup.
- 6.
Using substrate that fights your water chemistry goals. Crushed coral in a blackwater setup, or aquasoil in a hard-water cichlid tank, creates a constant chemistry battle that stresses fish and frustrates the keeper. Match substrate chemistry to species requirements.
Pre-fill checklist: what to verify before adding water
- Heavy hardscape is placed first and resting on the glass (or supports), not balanced on substrate that fish can dig out from under.
- Slopes are packed and shaped before water hits them. Once water is in, reshaping is 10x harder.
- Nutrient layers are capped with enough surface material (0.5+ inches) to prevent them from leaching into the water column when disturbed.
- Plant placement is roughed out if you are doing a planted build. Know where deep-rooted species need depth before the substrate is locked in by water weight.
- Equipment placement is finalized. Heater, filter intake, airline tubing, and any buried components should be positioned before substrate settles around them.
- You have extra substrate on hand for touch-ups after the first week of settling.
The substrate you choose today will be in your tank for months or years. Take the time to pick the right type, calculate the right amount, install it properly, and match it to your fish and goals. When everything else in the build sits on top of the substrate, getting this layer right first makes every decision after it easier.